
Shaving Cream Marbled Hearts – Easy Valentine’s Day Art Project for Kids
- Jessie

- Feb 1
- 6 min read
All art projects & crafts require adult supervision. This post may contain affiliate links. Read our full disclosure policy.

Get ready for a Valentine’s Day art project that’s colorful, messy in the best way, and tons of fun—Shaving Cream Marbled Hearts – Easy Valentine’s Day Art Project for Kids! This creative process-art activity lets kids swirl, mix, and marble paint into fluffy shaving cream to create beautiful one-of-a-kind heart designs. It’s a perfect blend of sensory play and art, making it a favorite for classrooms, homeschool art time, or a fun Valentine’s Day craft at home.
This shaving cream marbling art project is simple to set up and incredibly engaging for kids of all ages. With just shaving cream, paint, and paper, children can experiment with color mixing and patterns while creating stunning marbled hearts. Each heart turns out completely unique, which makes the project extra exciting—there’s no right or wrong way to marble, just lots of creativity and discovery.

Parents and teachers love this Valentine’s Day art activity for kids because it encourages exploration and creativity without pressure for perfection. Kids can swirl the paint with craft sticks, spatulas, or even their fingers, watching the colors blend together into beautiful marbled designs. It’s a wonderful opportunity to talk about color theory, patterns, and textures while letting kids enjoy hands-on, sensory-rich art.
This project is also fantastic for building confidence in young artists. Because marbling is unpredictable, kids learn that art doesn’t have to be perfect to be beautiful. Every heart is special in its own way, and children feel proud of their creations. Plus, the heart shape makes it a perfect keepsake to display, gift to family members, or use as Valentine’s Day decorations.
The Shaving Cream Marbled Hearts Craft works beautifully for classroom parties, art centers, or small group activities. It’s easy to prep ahead of time and keeps kids fully engaged as they experiment with swirling colors and lifting their prints to reveal the final design. When finished, the hearts can be trimmed, mounted on construction paper, or turned into cards for Valentine’s Day.


If your kids love this project, be sure to explore all the other Valentine’s Day-themed crafts for kids on the blog! Favorites include adorable TP Roll Love Bugs, the Heart Resist Q-Tip Painting project, the playful Love Robot Paper Craft, DIY Valentine Scratch-It Cards, and cozy Valentine Scented Playdough recipes. There are so many creative ways to celebrate love, kindness, and friendship through hands-on art.
One of the best parts about this easy Valentine’s Day art project is how flexible it is. You can use different color combinations, experiment with tools, or even layer prints for extra texture. It’s a great way to let kids take the lead and explore their creativity while still creating something festive and meaningful.
Whether you’re planning a Valentine’s Day classroom celebration, a homeschool art lesson, or a fun afternoon craft, Shaving Cream Marbled Hearts are a must-try. They’re fun, simple, and full of creative joy—perfect for making Valentine’s Day extra special. So grab the shaving cream, add some paint, and let your kids swirl their way to beautiful heart-filled masterpieces!

Shaving Cream Marbled Hearts
Supply List:
Shaving Cream (Foamy)
Cardstock Paper
Free Heart Template
Squeegee
Tray
Tempera or Acrylic Paint
Scissors
Printer
Popsicle Sticks
Disposable Tablecloth

Step 1: Download and Print the Marble Heart Template
Begin by downloading the Marbled Heart Template and printing it on 8.5x11 heavy white cardstock paper. Cardstock works best for this project because it’s sturdy and holds up well during the marbling process. Be sure your printer is set to “Actual Size” or “100%” so the hearts print at the correct size. Once printed, set the paper aside and get ready for the fun (and slightly messy!) part.

Step 2: Fill a Tray with Foam Shaving Cream
Fill a shallow tray or baking dish with foam shaving cream, making sure it’s nice and foamy. Use a popsicle stick or utensil to spread the shaving cream evenly across the entire tray. The surface should be smooth and flat so the paint can marble properly. A thick, even layer of foam helps create the best marbled effect.

Step 3: Add the Paint
Next, squirt paint directly onto the shaving cream. Acrylic or tempera paint both work great for this project. Play around with color combinations—I like using 2–3 colors that complement each other. For Valentine’s Day, red, pink, and purple work beautifully, but you can also experiment by adding an unexpected pop of color, like turquoise or blue.
Be careful not to cover the entire foam with paint. Leaving white areas of shaving cream helps create that beautiful marbled look. Using more paint will result in bolder colors, while less paint creates softer, more delicate patterns.

Step 4: Create the Marble Pattern
Using a popsicle stick, gently drag through the paint in straight lines across the foam. The key here is not to overmix—stirring too much will blend the colors into one solid shade. Light, gentle pulls through the paint allow the colors to swirl together just enough to create a marbled effect without losing their definition.

Step 5: Press the Paper into the Foam
Carefully place your paper hearts facing up into the foam. Lightly pat the back of the paper to make sure the entire surface touches the paint and shaving cream. You don’t need to press hard—just enough to ensure even contact across the page.

Step 6: Squeegee the Paper
Slowly lift the paper out of the tray and squeegee off the shaving cream and paint using a ruler, piece of cardboard, or spatula. This step can get messy, so make sure you have newspaper, paper towels, or a disposable surface underneath. As you squeegee, the beautiful marbled design will be revealed—this is always a favorite moment for kids!
Step 7: Let the Paper Dry and Flatten
Set the marbled paper aside and allow it to dry completely. The paper may warp slightly as it dries, which is totally normal. Once it’s fully dry, place the paper under heavy books or something flat and weighted for a few hours to help smooth and flatten it out before cutting.
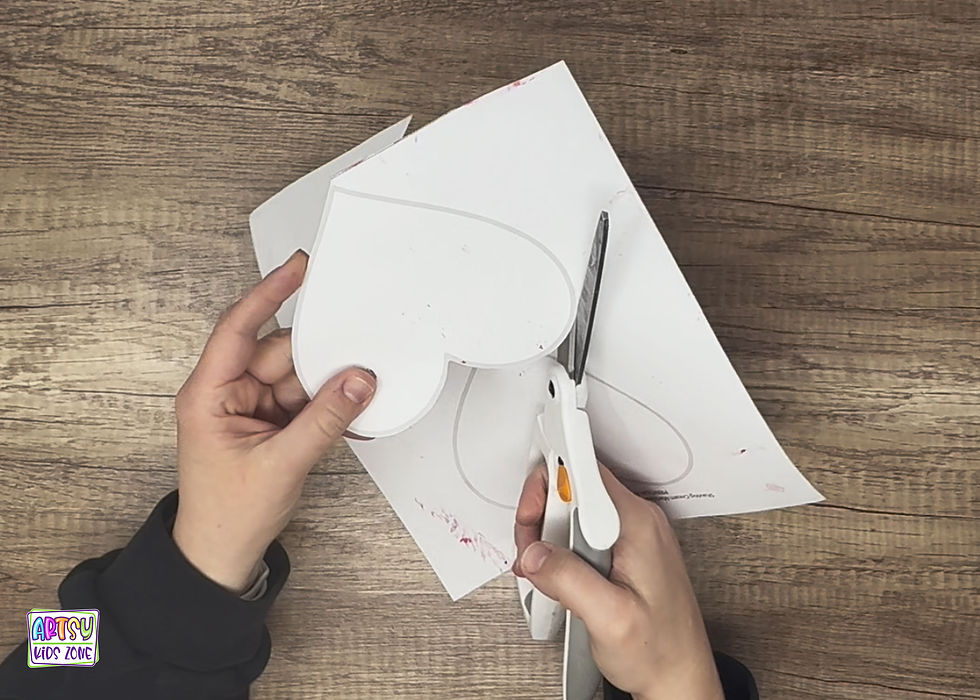
Step 8: Cut Out the Hearts
Once dry and flattened, carefully cut out the hearts along the outline. Remind kids to hold scissors properly, keep fingers away from the blades, and cut slowly. Always supervise younger children and encourage safe scissor use by sitting at a table and keeping elbows still while cutting.

Your Marbled Paper Hearts Are Complete!
Congratulations—your Shaving Cream Marbled Hearts are finished, and they look amazing! 💕 You can hang them up as Valentine’s Day decorations, tape them to windows, or write sweet notes on the back to give to friends, classmates, or family members. No two hearts are ever the same, which makes them extra special. Whether used as art or heartfelt Valentines, these marbled hearts are guaranteed to spread smiles and love!

How To Download Marbled Hearts Template:
Before you can begin you need to download the Marbled Hearts Template. This download is available to all members for free! You heard me correctly, memberships are free to join for everyone who is 18 years an older! Click on the link to signup and to find the Template. You choose which one you want to download and print.
***These printables are intended for personal and school use exclusively. Unauthorized copying, uploading, republishing, distributing or alteration of these files in any manner is strictly prohibited. If you plan to showcase these printables, please ensure to include a link back to artsykidszone.com.


If you’re looking for even more creative inspiration, Artsy Kids Zone is packed with fun, hands-on crafts for kids all year long! From holiday favorites to everyday art projects, there’s something for every interest and age. Kids can dive into imaginative play with paper bag puppets, explore simple origami projects, create colorful process art, or build interactive crafts that move, pop, and transform. Each activity is designed to be easy to follow, kid-friendly, and made with simple supplies you already have at home or in the classroom.
Beyond seasonal crafts, you’ll find themed projects that spark curiosity and creativity—like mermaid crafts, pirate adventures, fairy paper dolls, animal crafts, and STEM-inspired art activities. Whether your child loves messy art, pretend play, or quiet coloring projects, there’s always something new to discover. Artsy Kids Zone is all about encouraging creativity, confidence, and fun through art—making it the perfect place to find your next favorite kids’ craft!


Comments