


Easy Halloween Origami Cat for Kids – Black Cat Paper Folding Craft

All art projects & crafts require adult supervision. Artsy Kids Zone is a participant in the Amazon Associates Program, and I may earn a small commission from qualifying purchases at no additional cost to you. Read our full disclosure policy.

Black cats are one of the most iconic symbols of Halloween, making this Easy Halloween Origami Cat for Kids the perfect paper craft to celebrate the spooky season! With just two square sheets of paper and a few simple folds, kids can create an adorable paper cat that's more cute than creepy. Whether you're decorating for Halloween, planning a classroom craft, or looking for a fun screen-free activity, this easy origami project is sure to become a favorite.
One of the best things about this Halloween origami cat craft is that it's simple enough for beginners while still producing an impressive finished result. Kids will love watching two ordinary pieces of paper transform into a charming sitting cat with pointy ears, a curled tail, and plenty of personality.
This easy paper folding activity is perfect for Halloween parties, classrooms, homeschool lessons, library programs, fall festivals, or a cozy afternoon of crafting at home. Since it only requires paper and a marker to add the face, it's an inexpensive craft that's easy to prepare almost anywhere.

Origami is also a wonderful way for kids to build important developmental skills. As they carefully follow each fold, they'll strengthen fine motor skills, hand-eye coordination, concentration, patience, and problem-solving. It's a fun activity that combines creativity with learning.
After folding is complete, let kids customize their Halloween cats! Use black paper for a classic spooky cat, or experiment with orange, purple, gray, or patterned paper for a playful twist. Add yellow cat eyes, whiskers, a tiny pink nose, or even draw a witch's hat, bow tie, or Halloween collar to make each cat unique.
The fun doesn't stop when the folding is finished. Kids can use their origami cats as Halloween decorations, table centerpieces, bookmarks, greeting card toppers, or props for imaginative storytelling. Fold several cats to create an entire colony of spooky (but friendly!) felines.

Witch Popsicle Stick Craft. 
Agamograph 
Frankenstein Pumpkin 
Zombie Finger Puppets 
Mummy Puppet 
Straw Rocket 
Origami Templates 
Vampire Paper Bag Puppets 
Coffee Filter Bats 
3D Witch Paper Dolls 
Bat Origami 
Origami Cat & Template
If your family loves Halloween crafts, be sure to explore the rest of the Halloween collection on Artsy Kids Zone. You'll find favorites like Coffee Filter Bats, Halloween Paper Masks, Pumpkin Cootie Catchers, Zombie Finger Puppets, 3D Witch Paper Dolls, Vampire Paper Bag Puppet, and dozens of other kid-friendly Halloween projects that are perfect for October crafting.
So grab a couple of square sheets of paper and start folding! This Easy Halloween Origami Cat is a fun, festive, and beginner-friendly craft that kids will love making, decorating, and displaying all season long. Happy Halloween and happy folding!
Supplies Needed
Yellow & Black Acrylic Marker
Watch The Video
Easy Origami Cat Instructions
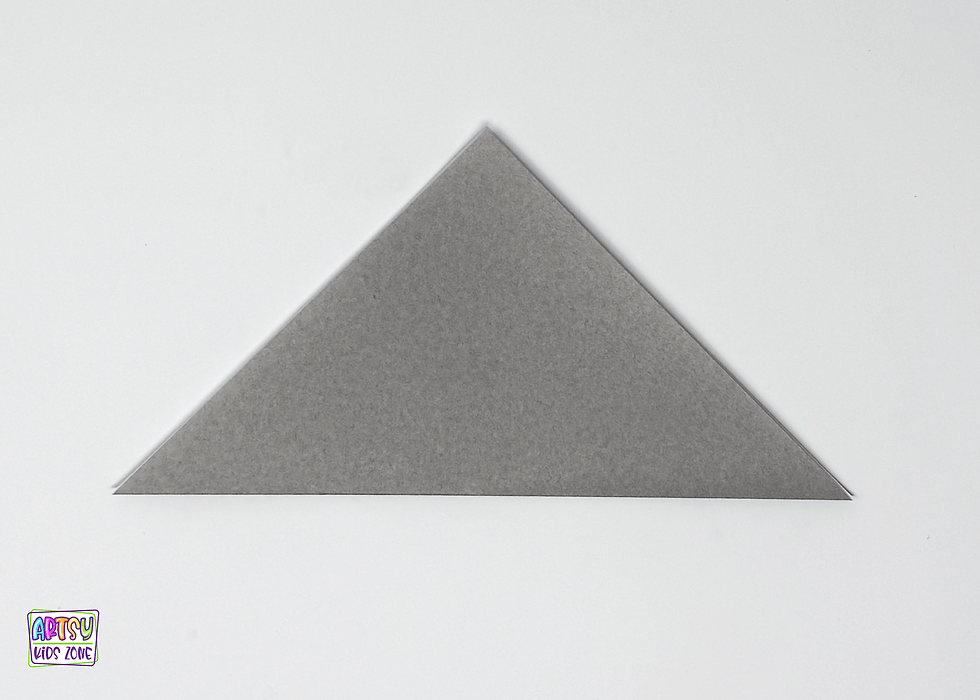
Step 1: Make the Diagonal Crease
Start with a square sheet of paper. Fold it in half to make a triangle and crease firmly.

Step 2: Make the Square
Make sure the folded edge is facing down toward you. Take the bottom right corner and fold it upward until it lines up with the top corner, then press firmly along the crease. Repeat this same fold with the bottom left corner. When you're finished, the paper will be folded into a square shape.
Take your time lining up the corners before making each fold. Crisp, accurate folds are the key to successful origami and will make the remaining steps much easier to follow. Don't worry if it isn't perfect—your origami cat will still turn out adorable!

Step 3: Fold the Ears
Make sure the two folded edges are facing up. Next, take the bottom right corner and fold it diagonally upward to create one of the cat's ears. Press firmly along the crease to keep it nice and sharp. Repeat the same fold with the bottom left corner to form the second ear.
As soon as both corners are folded, your origami cat will really start to come to life! Take your time making both ears the same size so your cat has a balanced look. Crisp folds will help give your cat those cute, pointy ears that make it instantly recognizable.

Step 4: Fold the Top of the Head
You'll notice there is now a point sticking up between the cat's two ears. Fold this top point downward until the space between the ears is flat, then press firmly along the crease. This simple fold gives your origami cat a finished head shape and makes the ears stand out even more.

Step 5: Fold the Chin
Right now, your cat's chin has a sharp point. To give it a softer, cuter look, fold the bottom point upward just a little to flatten the chin. Press firmly along the crease so it stays in place.
Next, gently open the layers of the cat's head and tuck that small folded flap inside so it's hidden from view. Close the head back up and press it flat again. This simple finishing touch gives your origami cat a smooth chin and a much more polished appearance.

Set your cat's head aside for now—it's time to make the body! Grab your second square sheet of paper, and we'll start folding the piece that your cat will be sitting on. Before long, you'll have a complete origami cat ready to assemble.
Using a second sheet of paper allows the cat's head and body to be folded separately, making this project much easier for beginners to follow. Once both pieces are finished, you'll simply attach them together to create an adorable sitting origami cat.

Step 6: Fold & Unfold
Take your second square sheet of paper and fold it in half diagonally to create a large triangle. Press firmly along the fold to make a nice, crisp crease. Once you've made the fold, carefully unfold the paper and lay it flat again.
The crease you just created will act as a guide for the next few folds, so take your time making it as straight as possible. A sharp crease will help the cat's body come together more easily in the following steps.

Step 7: Fold into a Diamond
Using the crease you made in the previous step as a guide, fold the bottom corner up until it meets the center crease. Press firmly to make a sharp fold. Next, fold the top corner down until it also lines up with the center crease. Once both folds are complete, your paper will have a neat diamond shape.

Step 8: Fold In Half
You're almost finished! Fold the cat's body in half along the center crease, then press firmly to create a sharp fold.
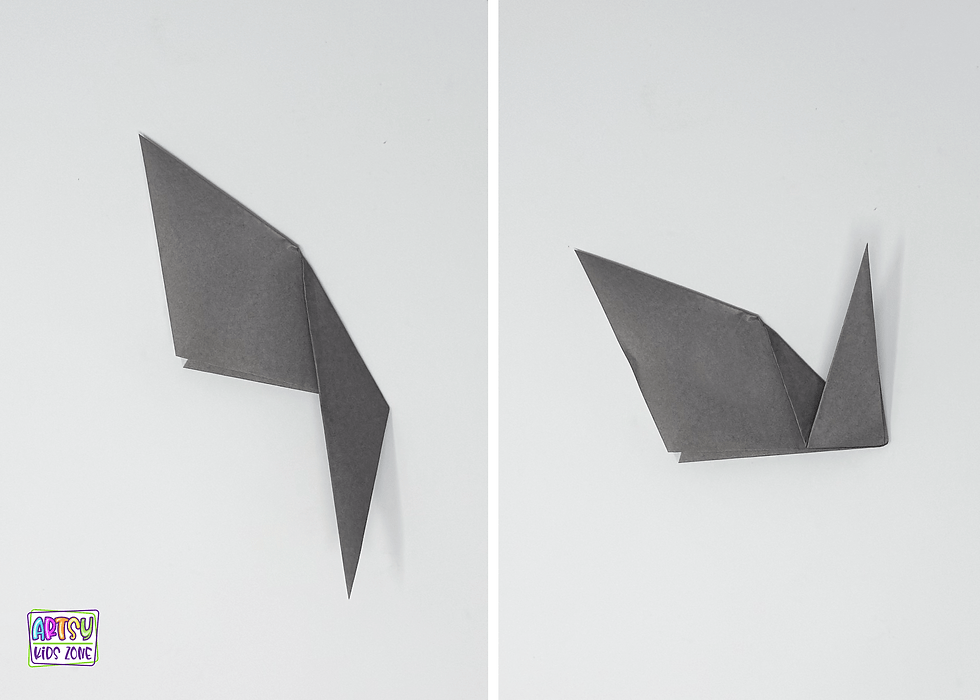
Step 9: Fold Tail Part One
Form the shape of the tail by folding the corner down and then back up.

Step 10: Fold the Tail – Part Two
Now it's time to shape the tail! Gently open the folded section where you created the tail crease. Using those fold lines as a guide, carefully reverse the fold by pushing it inside the body. As you flatten the paper again, the tail will pop out from the back of the cat.
This inside reverse fold may seem a little tricky at first, so take your time. Work slowly along the existing crease lines and press the paper flat once the tail is in place. This step gives your origami cat its signature upright tail and really brings the finished design to life.

Step 11: Complete the Cat's Face
Now it's time to bring your Halloween origami cat to life! Grab a black marker and draw on the cat's face. Add two pointed cat eyes, a tiny nose, whiskers, and a smile (or a mischievous grin) to give your paper cat its own unique personality. For an extra Halloween touch, color the eyes bright yellow to make them look just like a classic black cat.
This is your chance to get creative! Every cat can have a different expression—friendly, curious, sleepy, or a little spooky. Have fun customizing your origami cat and making it one of a kind before moving on to the final step.

Step 12: Assemble Your Origami Cat
It's time to put your origami cat together! Slide the top of the cat's body into the opening at the bottom of the cat's head. The body should fit neatly between the layers of paper inside the head, holding the two pieces together. Adjust the head until it sits straight on top of the body.
If you'd like your origami cat to stay together permanently, add a small dab of glue inside the head before sliding the body into place. Once the glue dries, your adorable paper cat will be ready to display, decorate, or use for imaginative play.

Congratulations—you've created your very own origami cat!
Discover More Kid Friendly Crafts

Easy Rock Painting Ideas 
Dino Finger Puppets 
Pirate Paper Masks 
Rainbow Fish Craft 
Snake Coloirng Pages 
Hatching Dragon Egg 
Fire Dragon 
Mermaid Craft 
Tiger Masks 
3D Fairy Paper Dolls 
Paper Dino Feet 
Agamograph
If your kids loved these cootie catcher origami puppets, be sure to explore everything that Artsy Kids Zone has to offer! There’s a whole world of creative fun waiting, from interactive paper bag puppets and playful clothespin puppets to engaging coloring pages and imaginative paper masks. Whether your child is into animals, pirates, dinosaurs, fairies, or something in between, you’ll find endless projects designed to spark curiosity and creativity.
At Artsy Kids Zone, it’s all about giving kids opportunities to create, explore, and express themselves. These hands-on crafts encourage children to color, cut, glue, and build—helping develop fine motor skills while boosting confidence and imagination. Whether you’re crafting at home, in the classroom, or just looking for a fun activity, you’ll find plenty of ways to keep kids entertained and inspired. The fun doesn’t stop here—there’s always something new to discover!


Comments