
Mummy Paper Puppet Craft For Kids
- Jessie

- Oct 28, 2023
- 5 min read
Updated: Sep 25, 2025
All art projects & crafts require adult supervision. This post may contain affiliate links. Read our full disclosure policy.

Get wrapped up in spooky fun with the Mummy Paper Puppet Craft for Kids! Perfect for Halloween celebrations, classroom parties, or a creative afternoon at home, this craft combines art, imagination, and play. Children will love transforming a simple piece of paper into a funny, creepy mummy puppet that actually comes to life when they slip their hand inside to make the mouth move. It’s silly, interactive, and the perfect way to get kids excited for Halloween.
This Halloween puppet craft is simple to make and packed with entertainment value. All you need are a few basic supplies: cardstock paper for the printable template, crayons or markers for coloring, scissors for cutting, and glue for assembly. That’s it! Once put together, the puppet becomes a fun toy that kids can use for storytelling, pretend play, or even as part of a Halloween puppet show.

Parents and teachers love that this craft is both engaging and educational. Kids get to practice fine motor skills while cutting and gluing, and coloring allows them to express their creativity by designing their own version of a spooky mummy. The interactive puppet design keeps kids entertained long after the crafting is finished, making it more than just a decoration—it’s also a playtime activity.
This Mummy Puppet Craft is a fantastic choice for Halloween parties, classroom art centers, or rainy-day activities at home. The finished puppets make adorable and festive decorations, but the real fun comes when kids bring them to life. The moving mouth design adds excitement, making this craft feel like both an art project and a toy in one. Children love using their puppets to act out stories, tell jokes, or give a spooky “boo” to their friends and family.


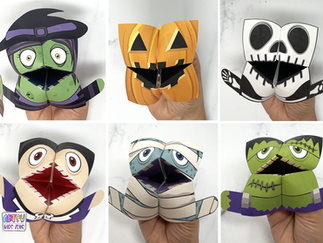
Best of all, the mummy isn’t alone! This puppet is part of a larger Halloween Paper Puppet Series that also includes a creepy-cute Zombie Puppet, a quirky Frankenstein Puppet, and a spooky Bat Puppet. Collecting and creating all four characters is a fun way for kids to build their own monster crew. Together, they make the perfect set for Halloween-themed play or puppet shows.
Another reason parents appreciate this craft is its affordability and ease. With just a printer, cardstock, coloring tools, scissors, and glue, you can make as many puppets as you’d like. This makes it an excellent option for classrooms, group activities, or family crafting sessions. Plus, because each child colors and assembles their puppet in a unique way, every mummy will turn out differently. No two puppets ever look the same, which adds to the fun.
This printable mummy puppet craft also encourages imaginative play. Kids can create silly voices for their mummy, use it to act out spooky Halloween skits, or combine it with other puppets from the series for an interactive monster show. Crafts like this not only keep kids entertained but also spark creativity, storytelling skills, and confidence as they share their creations with others.
Whether you’re a teacher searching for a no-prep Halloween classroom activity, a parent planning a family-friendly Halloween party, or just looking for a fun seasonal craft, the Mummy Paper Puppet Craft for Kids is a perfect choice. It’s simple, budget-friendly, educational, and full of spooky charm. Download the printable template, grab your supplies, and let your kids enjoy hours of creative fun with their very own mummy puppet!
Materials Needed:
Mummy Puppet Template
White cardstock paper
Scissors
Glue
Markers, crayons or colored pencils

Print the Mummy Puppet Template
To kick off your mummy project, first download and print the template. Find directions at the end of this post for purchasing the template. For best results, I recommend printing the template on 8.5x11 white cardstock.

Once, you have downloaded the Mummy Puppet Template, print it on 8.5x11 white cardstock paper and color it in with crayons, markers or colored pencils.
Assembling Your Mummy Paper Puppet:
I've provided comprehensive step-by-step instructions to assist you in assembling your Mummy Paper Puppet. While I've made every effort to illustrate the process with photographs, there is a video tutorial featuring a similar puppet, the Pirate Paper Puppet in a different post. The assembly process for both puppets shares many similarities, and watching the video can be a great way to resolve any lingering questions.

Step 1: Cut
Using scissors, cut out each of the shapes.

Step 3: Fold on the dotted line!
Fold on all of the dotted lines. Start with the head by folding the mouth in half. You do this by aligning the glue tabs together and creasing down on the center of the mouth to get the fold. Then fold all four glue tabs on the dotted line. Then fold the top and bottom lips. Last of all fold the glue tabs on the ears and the two white strips.

Step 3: Assemble the Mummy!
Glue the pieces together to bring your puppet to life. Start by glueing the legs to the body. Then glue the four glue tabs located on the main body to the back of the mouth at the "jaw line". Then glue the ears to the side of the head. Allow for the glue to completely dry before glueing the next pieces together.

Flip it upside down and glue the two paper strips in an arch on the upper and lower part of the jaws. These strips of paper will make it so your hands stay in the puppet and gives you the ability to open and close the bat's mouth.

There you have it! A Mummy Paper Puppet! Embrace the spooky delight of this creative craft as your mummy puppet comes to life with every move. Let your imagination run wild, and perhaps, let it out of it's tomb. Now, it's time to put on a spooktacular show, full of eerie adventures. Happy crafting, and don't forget to check out these other magical puppets.

How Do I Download the Mummy Template?
You can purchase the Mummy Template directly from Artsy Kids Zone. The template is available in in black and white (perfect for kids to color and customize. After purchase, you’ll receive an instant digital download—no waiting, no shipping costs. Simply download the PDF, print at home, and start crafting! By purchasing, you’ll not only enjoy this fun project, but you’ll also be supporting Artsy Kids Zone so we can continue creating more creative activities for kids.
***These printables are intended for personal and school use exclusively. Unauthorized copying, uploading, republishing, distributing or alteration of these files in any manner is strictly prohibited. If you plan to showcase these printables, please ensure to include a link back to artsykidszone.com.


If you enjoyed crafting this Mummy paper puppet, you're in for a treat! Make sure to check out these other Halloween crafts that will surely add more spook and creativity to your festivities. From wickedly delightful bat to ghostly surprises, there's a plethora of hauntingly fun crafts waiting for you. Unleash your imagination and have a fa-boo-lous time creating these eerie projects. Happy crafting and have a 'boo-tiful' Halloween season!


me gustaría tenerlas igual a color donde las consigo saludos desde Envigado Colombia mil gracias