
Zombie Paper Puppet Craft For Kids
- Jessie

- Oct 5, 2023
- 5 min read
Updated: Sep 25, 2025
All art projects & crafts require adult supervision. This post may contain affiliate links. Read our full disclosure policy.

Get ready for some spooky fun with the Zombie Paper Puppet Craft for Kids! Perfect for Halloween parties, classroom activities, or an afternoon of imaginative play, this craft is both creepy and creative. Kids will love building their very own zombie puppet from a printable template, then bringing it to life with moving jaws and silly expressions. Whether your little ones are into monsters, Halloween crafts, or just love pretending, this paper puppet is sure to become a seasonal favorite.
The best part about this zombie craft for kids is how simple and engaging it is. Just print the template on heavy cardstock, grab some crayons or markers, and let the creativity begin. Once colored, kids cut out the pieces and glue them together to form the puppet. When it’s finished, place a hand inside to make the zombie’s mouth move—it actually opens and closes! This interactive design turns ordinary paper into a monster full of personality.
Parents and teachers appreciate how this craft develops fine motor skills, encourages creativity, and provides hours of pretend play. Kids love choosing their own zombie styles—scary, goofy, or just plain silly—and adding unique details while coloring. The moving mouth adds an extra element of fun, making the puppet feel more like a toy than just a craft. It’s an affordable and low-prep way to bring excitement into your Halloween celebrations.
This Halloween paper puppet isn’t just about making art—it’s about bringing imagination to life. Children can use their zombies to tell spooky stories, act out silly skits, or even create a mini puppet show. It’s perfect for classrooms, where kids can show off their puppets to friends, or for family craft nights, where everyone can join in the fun. Plus, the puppets make fantastic decorations for Halloween parties or trick-or-treat events.


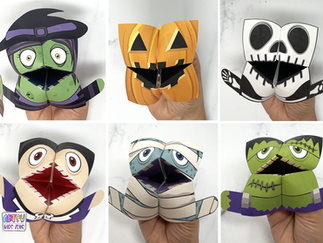
One of the coolest parts about this project is that it’s part of a whole Halloween Paper Puppet Series. Alongside the zombie, kids can also craft a spooky Bat Paper Puppet, a quirky Frankenstein Puppet, and a creepy-cute Mummy Puppet. Collecting and creating the entire series adds even more fun, letting kids build their own monster crew for pretend play or festive holiday displays. Together, these puppets create a full set of Halloween characters that kids can’t wait to bring to life.
The Zombie Paper Puppet Craft is also a great way to mix learning with play. As children color, cut, and glue, they strengthen hand-eye coordination and fine motor skills, while also practicing following instructions. The interactive puppet keeps them engaged long after the craft is finished, making it one of those rare projects that doubles as both an art activity and a playtime toy.
Parents love that this puppet is printable and reusable. You can print it as many times as you like, making it perfect for group activities, classroom art centers, or siblings crafting together. Each zombie turns out differently depending on how it’s colored and decorated, which means no two puppets will ever look the same. It’s the kind of project that kids will want to make again and again.
Whether you’re hosting a Halloween party, teaching a classroom full of excited students, or just looking for a creative way to spend a fall afternoon, the Zombie Paper Puppet Craft for Kids is a must-try. It’s spooky, silly, and so much fun to play with once it’s complete. Download the template, print it on heavy cardstock, and watch your kids’ imaginations come to life as they build their very own zombie with a moving mouth!
Materials Needed:
White cardstock paper
Scissors
Glue
Markers or colored pencils

Print the Zombie Puppet Template
To kick off your Zombie project, first download and print the template. Find directions at the end of this post for purchasing the template. For best results, I recommend printing the template on 8.5x11 white cardstock.

Once, you have downloaded the Zombie Puppet Template, print it on 8.5x11 white cardstock paper and color it in.
Assembling Your Zombie Paper Puppet:
I've included step by step directions on how to assemble your puppet. Although I've tried my best to capture the steps with photos, I recommend watching the video provided to really get an understanding on how to do it.

Cut
Using scissors, cut out each of the shapes.

Fold on the dotted line!
Fold on all of the dotted lines. Start with the head by folding the mouth in half. You do this by aligning the glue tabs together and creasing down on the center of the mouth to get the fold. Then fold the the lips and four glue tabs on the dotted line. Last of all, fold all of the glue tabs on the ears and the two white strips.

Assemble the Zombie!
Glue the pieces together to bring your zombie puppet to life. Start by Attaching the brains to the top of the head. Then glue the ears and arms on. Glue the legs to the bottom underneath the torso. Allow for the glue to completely dry before glueing the next pieces together.
Then glue the four glue tabs to the back of the mouth at the "jaw line". Flip it upside down and glue the two paper strips in an arch on the upper and lower part of the jaws. These strips of paper will make it so your hands stay in the puppet and gives you the ability to open and close the zombie puppet's mouth.

There you have it! A Zombie paper puppet! Embrace the spooky delight of this creative craft as your zombie puppet comes to life with every move. Let your imagination run wild, and perhaps, let out a friendly zombie groan or two. Now, it's time to put on a spooktacular show, full of eerie adventures and ghoulish charm. Happy crafting, and may your zombie puppet's journey be filled with all the delightful chills that Halloween brings!

How Do I Download the Zombie Template?
You can purchase the Zombie Template directly from Artsy Kids Zone. The template is available in in black and white (perfect for kids to color and customize. After purchase, you’ll receive an instant digital download—no waiting, no shipping costs. Simply download the PDF, print at home, and start crafting! By purchasing, you’ll not only enjoy this fun project, but you’ll also be supporting Artsy Kids Zone so we can continue creating more creative activities for kids.
***These printables are intended for personal and school use exclusively. Unauthorized copying, uploading, republishing, distributing or alteration of these files in any manner is strictly prohibited. If you plan to showcase these printables, please ensure to include a link back to artsykidszone.com.


If you enjoyed crafting this Zombie paper puppet, you're in for a treat! Make sure to check out these other Halloween crafts that will surely add more spook and creativity to your festivities. From wickedly delightful bat to ghostly surprises, there's a plethora of hauntingly fun crafts waiting for you. Unleash your imagination and have a fa-boo-lous time creating these eerie projects. Happy crafting and have a 'boo-tiful' Halloween season!


Comments